Friday 18 November 2016

November Update

I was trying to keep my entries chronological, but it's so long between posts that I'll write about what I've most recently worked on, and fill in the gaps later (eg, I'll get back to fitting the exhaust later).  However, if you want to know if I've worked on anything that's not in a post, please ask.

So today I've replaced one of the radiator hoses.  I think I described in an earlier post how I had dumped all the engine coolant when a hose came off a stub pipe that wasn't connected properly.  I fixed it at the time, but the same thing happened again a couple of weeks ago.  This time it looked like the end of one of the rubber hoses had perished.  However, I tried to put it together again.  Unfortunately, I used a small amount of oil on the stub pipe to try to get it further onto the hose, but although I tightened the clip as tight as I could, it easily came apart again, dumping another volume of coolant down the drain.

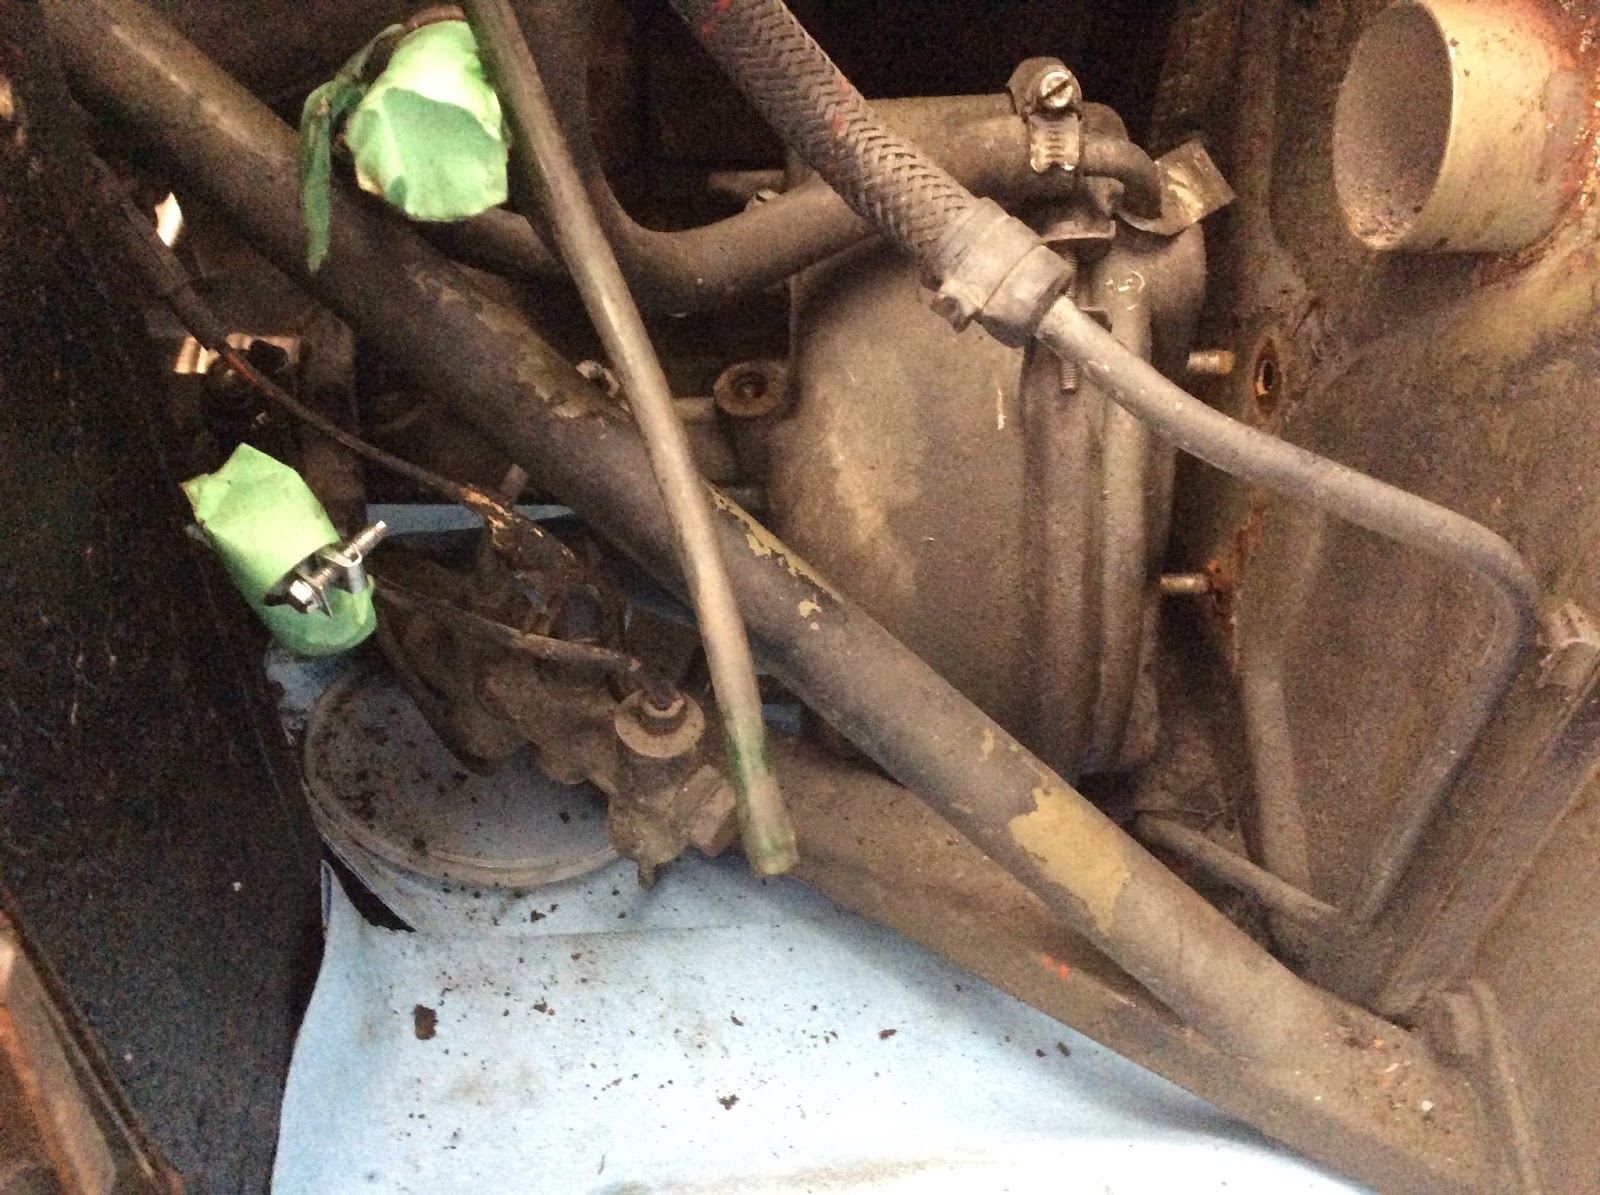
This time, I decided to look more closely at these problem hoses, identifying them properly through my workshop manual and SNG Barrett's parts manual.  It turns out that it should only be a single hose from the water pump to the oil cooler - whoever had put the car together before I got it must have had problems with the hose, split it in two, and found an appropriate diameter steel pipe to make a connection stub from.  Having worked this out, I ordered the correct hose from SNG, and it arrived within a couple of weeks.  The old 2-piece hose and the new correct hose are shown together in the photo below:
New water pump / oil cooler hose, compared to 2-part hose that had been cobbled together.

The bottom part of the old hose came off OK, since I'd had it off a couple of times before.  I was a bit worried that I'd have trouble with the upper part, attached to the outlet from the water pump as it didn't appear to have been touched in a long time, and access to it was a bit restricted.  Earlier this week I sprayed the hose clip with release oil, so that loosened easily.  The hose was quite tight on the pipe, but with manipulation, it came off relatively easily.

Putting the new hose on was a simple job, so now I'm a lot more confident about my cooling system. I topped up the coolant and ran the car round until the engine was fully warm - in fact, the gauge only just got into the "normal" lettering, which is the lowest I've had it.  This may have been helped by improved flow through the new hose, as the old hose was flattened on the bend.

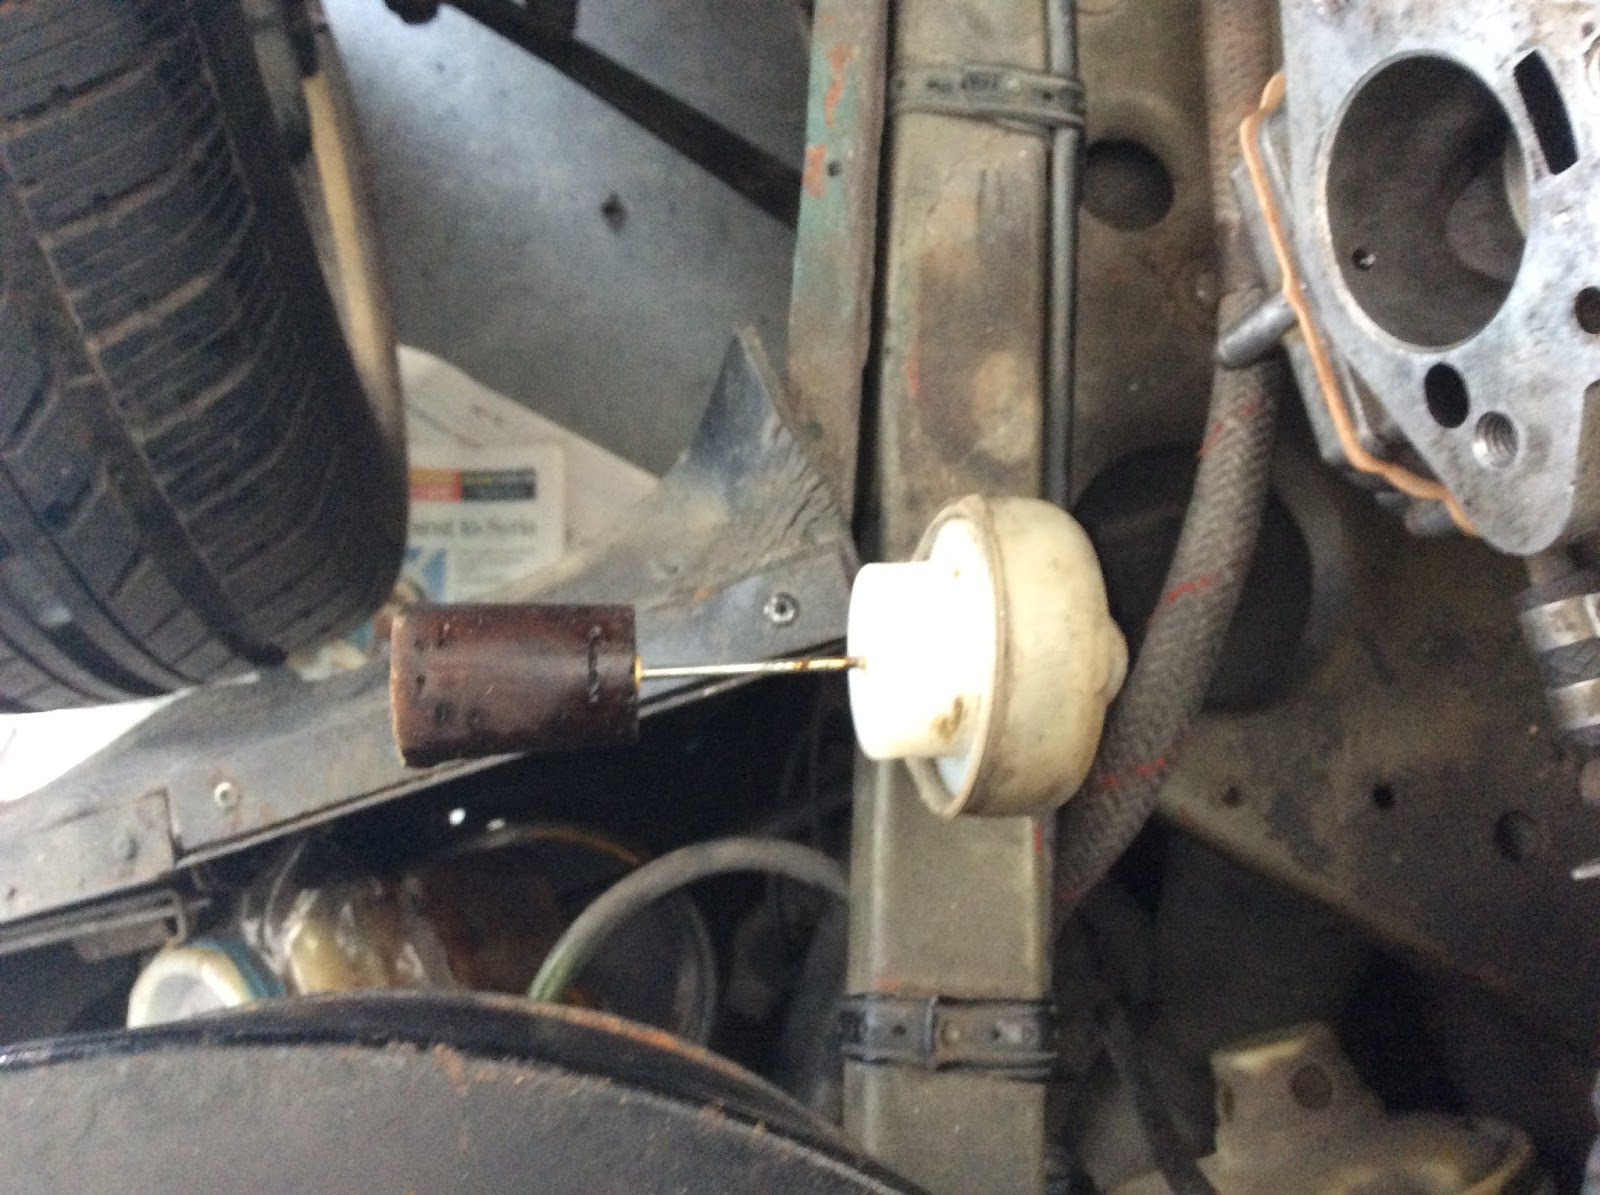
This is the second improvement I've had in the cooling temperature.  When I first started running the car, the temperature gauge would rise all the way to the hot end of the scale.  I had heard that old gauges could sometimes read high, and as the engine had never actually overheated (dangerous logic, I know!) I continued to run the car, although not for long after it had reached high temperature.  Having said all this, I still looked for "easy" ways of trying to get the gauge to read properly.  I decided I might as well replace the thermostats, so bought two 74C rated 'stats from SNG.
One of the original thermostats that I replaced with a new one from SNG Barrett.
Physically, there doesn't seem to be any difference between the old and the new.  I still need to test the two old ones that I took out.

Since I have done that, the temperature gauge has never gone back to full scale, and while the car is moving, it now stays at the low end of the "normal" lettering.  A nice success.

The other thing I did today was to fit the rear number plate trim.  It's a chromed(?) plate that fits around the rear number plate carrier.  It's a bit distorted, I guess from the accident the car was in before I bought it, but I've managed to secure it in place using small self-tapping screws (see photo below):


The number plate trim is the "silver" rectangles seen inside the lights.
I had to remove the lights to fit the trim, as the lights help to keep the trim in place.

Now I have this trim in place, I can fit the carrier that I also bought from SNG.

So, continuing to make progress.  Still need to sort out the door locks and handles - I may try to get a locksmith to help me on this one - and the overriders and reversing lights on the back bumper, but I'm getting close to needing to get the sills replaced.  This is a good job to get someone to do for me over the winter, when I won't want to drive the car, anyway.  Hopefully that will allow me to get a Safety Certificate for the car, and I'll be able to take it out onto the highways come the Spring.  (Fingers crossed!!).

Tuesday 27 September 2016

Work During September - Bumpers, Exhaust & Cooling System

Wow, didn't realise it had been so long, or that I had done so much, since posting the last blog.

Bumpers
So, regarding the bumpers, I had been able to fit the original front bumpers and overriders, even though they are a little distorted, although not so much as you would really notice.  At the back, both original side bumpers are badly twisted, so won't go back in their current state.  I don't remember if I had mentioned in a previous post, but I bought a complete set of Series 3 bumpers off the internet. They were a good price, but unfortunately were from a Roadster, which I found out has a slightly differently shaped back end to the 2+2.  Having said that, I decided to fit the two side parts, which went on OK, since the bolt holes line up with the car.  However, the original centre piece has different fittings to the Roadster centre piece, so I haven't been able to fit that - it would have been ideal to fit as it has the correct fittings for mounting the overriders and the reversing lamps.  Anyway, I played around with the Roadster centre piece, and with a bit of filing, have been able to mount it between the two outside pieces.
Roadster rear bumpers fitted
It looks pretty good (if you don't get too close).  Now I need to make up brackets to mount the overriders and the reversing lights.

Exhaust
I'd been running the car with bits of an exhaust (not correct E-type parts) since I'd got the engine running - it was amazingly noisy - the kids didn't want to come near the car for fear of it blowing up!! - so I finally bit the bullet and ordered a stainless exhaust from SNG Barrett.  (Fortunately this was after the "Brexit" vote, so it was less expensive that when I'd priced it a few months ago due to the change in the GBP/$US exchange rate).

The new system arrived within about a week.  I then went out and bought a pair of ramps off Kijiji, which I used, along with a pair I am borrowing from Steve, to raise the car about 10ins off the floor so I could get at the exhaust system.

To my great surprise and relief, most of the parts of the exhaust came apart easily.  The only one I had a bit of trouble with was the sealing olive between the front and inter-pipes on one side.  It seemed to be stuck in the front pipe, which I haven't changed, but it finally came out with a bit of brute force (and fortunately no damage to the front pipe).  So once all that was off, I bought new s/s fasteners and got on with fitting the new system.

I got a bit confused with the orientation of the twin silencers, since the inlet and outlet stubs are both offset from centre, but after a few tries in different orientations under the car, I finally came to the correct positions.

I thought I'd need help installing the exhaust, but with strategic positioning of a pair of axle stands, I was able to support the weight of the various components while I fitted and tightened the clamps, so the whole thing went on in two sessions of a couple of hours each, including putting on the Quad Outlet Finisher ("whale tail").

Cooling System
While the car was raised, it presented a good opportunity to work on the cooling system.  The fans don't come on automatically, and the header tank was leaking.  I had also had the bottom hoses spray coolant out because the rubber hose wasn't sufficiently over a stub pipe for the clamp to grip properly, so I had had that great leak, and lost all the cooling fluid, shortly after I'd started running the car.

I'd bought a new coolant reservoir, so replacement of that didn't take much doing, and I replaced some metric fasteners that had been used previously with 1/4" UNC, which seem more appropriate for the car, seeing as all other fasteners are either UNF or UNC threads.

Under the car, after draining the system, I took off a couple of the bottom hoses and their stub connector pipe and re-fitted them, ensuring that there is now sufficient overlap of the hose on the pipe, so the clamps are well secure.

For the automatic running of the fans, I have bought a new thermostatic switch that should start the fans at the correct temperature - I'd assumed that the original on the car had failed.  However, when I actually got under the car to check it out properly, it turns out that there is no wire going to the switch, so it may actually still be working.
The Thermostatic switch that should bring in the radiator cooling fans (if it were connected).

Anyway, I decided I should replace it anyway, but I haven't been able to undo the bolts securing it into the pipe, so I've decided to leave it for now, and to continue to use the manual switch to run the fans all the time the engine is running. (Just need to remember to switch it off again!).

Getting the Car off the Ramps
Once I'd finished as much as I could do with the cooling system, I had to get the the car down off the ramps, then get the back end up on its own so I could get the rear silencer fitted.  I had originally got the car onto the ramps by raising, first the front end, then the back end using my hydraulic jack, then pushing the ramps under the wheels.  However, the rear silencer sits right below my jacking point, so once the silencer was fitted, I wouldn't be able to use that point.  So, before fitting the rear silencer, I used the jack to bring the car down off both sets of jacks, then raised the back again, using the jack, and pushed the ramps under the wheels.  I used the metal ramps, as they are about an inch higher than Steve's plastic ones.  That all went fine, and I installed the back box.

I'd positioned the ramps so I could roll the car down off them, leaving enough room at the front of the car (it was in the garage for all this work) for it to roll fully off the ramps well before getting near the work bench.  For this job, I had used the metal ramps that I'd bought recently.

Since I was getting ready to start the car for the first time with the new exhaust system on, Liz and the kids had come over with me to hear the new "quiet" car.  So, with the kids sitting in Liz's car watching a video, and Liz making sure I was lined up to come straight down the ramps, and not going to hit anything at the front, I got the car started, put it into gear, and slowly let off the brake to get the car onto the slope of the ramps before putting it in neutral to run down the rest.  But, before I could brake and put the car into neutral, I had dropped to the floor!!  With the lack of friction between the metal legs of the ramp and the concrete floor, the push of the tires on the ramp had pushed the ramps back, rather than pushing the car forward, so the rear wheels had come down the ramp, albeit a lot quicker than I had intended, but by the ramps moving relative to the car and the floor, rather than the car moving relative to ramps and floor.

One of the ramps ended up just in the entrance to the garage, but the other one had been pushed about 3 feet into the driveway.  Fortunately nobody had been anywhere near the back of the car - Liz was at the front, the kids were in Liz's car and there were no cars driving past - so there were no injuries and no damage.  However, I realise how very lucky I was - it could have been a lot more serious.

The car also came off with no adverse affects - I guess because it had gone down the slopes of the ramps, rather than falling vertically with no "vertical control", the stress on the suspension was minimised and wasn't affected.

This seems like a lot of work (and learning) since my last post, but there are other things I've also done on the car - rear hatch seal, accelerator pedal and windscreen washer hose, which I'll give more details about in the next post (which won't be as long in coming as this one was since the last!).

Friday 5 August 2016

Continued Progress

Again a long time between posts!

I've been getting to the car just about once a week.  Every time I go, I run it around the driveways and get it fully up to temperature.  Still haven't done anything with the exhaust, so still using the ramps to help back out of the garage, but I'm getting a lot more confident with it now.  Using the full choke to start from cold, and it takes a few turns before it fires, but once I've reversed the car from the garage, I can pretty much close the choke straight away.  I run the car round until it's up to temperature (which means that the gauge is reading right at the top at hot, but it hasn't "over-heated" yet - don't know if that's because I'm not running it for long enough, or if it's just where the gauge runs!.  I'm also keeping the fans running permanently with the manual switch, to ensure goos air flow across the radiator).  Once at temperature I stop the engine, and work on the car.

Once the brakes were sorted (I still need to get the warning light to go off, but I believe that will need me to bleed to the differential pressure switch between the two circuits, which I haven't got to yet),  I put back the rear seats, which I'd had to remove to get to the inboard rear brakes.  The back and the seat went in fine, but I struggled a bit with the seat belts.  The belts were only held at a single mounting point when I got the car, so I had to find all the correct bolts and mount them correctly.  I found a comment in a car forum on-line, that all seat belt mounting fittings are 7/16 UNF.  Steve had some spares, and with the ones I found with the car and his spares that he let me have, I got all four seat belts mounted correctly.  Unfortunately, the passenger-side one won't retract, so I'll have to replace that one, but the drivers side is working fine.  With the seat belts in, I was bale to work out where some of the trim fittings went in the car, so things are now looking quite good inside (and I've got a bit of space back on the shelves in the garage).

After the seat belts, I started to look at the door locks.  The keys won't turn in the barrels, so I've bought new barrels.  I started by taking the drivers door handle apart:
The parts of the drivers side door lock.
....and replaced the barrel in that one.  When I took the old barrel out, I found it was broken, so though I'd resolved it by just replacing the barrel.  However, although I can get the key to turn the new barrel, I can't work out how to keep the plunger extended when it's in the "open" position - I think I'm missing another part, but don't have one that came out with the original barrel.  The best way for me to see the "correct" set-up will be to take apart the passenger door handle.  I was reluctant to do this while that side was working OK.  However, now I've fitted new door seals, that one has stopped working properly aswell, so I'll take it apart soon to work out what's missing with the other one, and to replace its barrel.

I did try to find a locksmith that I could walk in to, to talk about the lock.  The only one I found to walk in to  wasn't interested in looking at an old automotive lock, and all the others that I've found on the internet, all seem to be mobile businesses now, with no home base to walk into - disappointing, but a sign of the times, I suppose.  I'll just have to call somebody out (at what $$ cost?) if I can't work it out from the passenger door lock.

Having been stumped for now with the door locks, I decided to go back to installing the seals that were missing.  I had bought a complete seal kit some months ago, so I went through that and found the ones that I needed.  I've now replaced the A-pillar, sill and frame seals on both doors, the main bonnet seal and the boot seal.  I need to see a car with the boot seal in place, because mine doesn't seem to be sitting properly.  (It's probably the wrong way round, but logically, it looks right!!).

Steve had a flat plastic tool that he lent me to help with seating the seals, but when he was away, I was struggling with a screwdriver to fit them, which wasn't working well.  Finally, in exasperation, I went to Canadian Tire, to see what they had on the shelf.  I found a nice little set of tools, designed for installing seals, which I bought, and which I found to work really well (photo below).
Seal Fitting Tools
There are two sets of these tools in the pack - the orange set is a softer plastic, and the black set is hard plastic.  I found the orange tool with the curved end was ideal for fitting the seals around the door frame, and used it continuously; the seal went in really quickly.  A good purchase!

Before fitting the seals, with Steve's help, I managed to install the two rear quarter lights.   I'd already worked out what fasteners I needed for the hinge plates (#8 UNF, I think), and once I'd got the countersunk version, we managed to get the hinge end in OK.  However, the tapped holes for the fasteners for the clasp at the back of the q-light were hidden behind the trim, with the trim not easy to get off.  However, I found some #6 UNF screws in the mess of parts that came with the car and, amazingly, they took up the thread with no problem.  A bit of luck, because it would have been a pain to have to work out what would fit in the hole, if I hadn't come across these.

That's the update for now.  I'll fill in on bumpers next time.


Tuesday 14 June 2016

First Outdoor Drive

It's been a long time since my last post, but that doesn't mean I haven't been doing anything on the car.  After the last one, I went back to the brakes and bled them properly.  Not surprisingly, I got a lot of air out all round, especially from the front right, but eventually eliminated air bubbles.  There was now a good feel to the brake pedal, so I felt it was time to let the car see the sunlight.

Before getting the car out, I needed to raise the exhaust.  When I bought it, the back section was separated from the car, and one of the resonators was missing.  The last owner didn't have the correct mounting brackets, so he had tried to hold the partial exhaust up in place with wire.  Unfortunately he had attached the wire to the heat insulator, which the exhaust's weight had pulled down.  So for this first run I managed to get the wire onto the actual brackets for supporting the exhaust and raise it far enough to give me decent clearance.  At the same time I put in my order with SNG Barrett for the correct exhaust hanger and rubber supports.

I managed to persuade Steve to forego his lunch break to spend time to see an historic event (!!), and my eldest son, Jamie, came along for the entertainment.

The car started no problem, and I let the temperature rise before moving it.  We put down two pairs of wooden planks to give me a ramp out of the garage to the driveway, and I put the car into drive.  Very tentatively I let my foot off the brake and let the car creep forward ............ and it crept!!

The car came down the ramp fine, my confidence in the brakes increasing continuously as they held the car with no feelings of sponginess whatsoever.  If the car had eyes, it would be blinking thousands of times per minute to get used to actual daylight after being inside in limited light for so long.

At the bottom of the ramp I turned the car to the left and actually drove my E-type Jag around my other car.  At this point I noticed that the temperature gauge was up at hot .......... then I noticed the steam coming from under the engine.  I pulled over and turned off the engine, fearing the worst - did I have a crack in the block?  See below for a brief video of this event, ending with torrential rain coming from the bottom of the engine.


Fortunately, it wasn't the worst case.  Actually it wasn't too bad at all.  One of the bottom hoses had not been pushed properly onto the stub connector, and the jubilee clip was just compressing the rubber hose. So with pressure and a bit of movement, the hose had pulled back and let the coolant escape.  The unfortunate part was that the hose was right at the bottom of the engine, and the coolant was very hot, almost steaming.  I ended up having to wait for the coolant to drain out before I could get to the hose.  I got it back over the stub pipe, and the jubilee clip tightened properly, so now it's secure again, although later I'll do a full adjustment of all the hoses.

To get the car back into the garage, I filled the system with water (after a long walk to the office toilet and back for enough water) and what little anti-freeze I had, and just drove it straight in.  Steve had had to leave as his lunchtime was over, but Jamie did a good job of guiding me back up the ramps and into the garage.

Keep checking back.  I've had the car out a couple of times again since this first one.  I'll update on those "adventures" soon.

Monday 16 May 2016

Car Moving Under its Own Power

I'll get back to the details of the brake work shortly, but suffice to say, for this post, that I've got the brake system back together and it works!!

So, having made sure that the hydraulic brakes as well as the handbrake will both hold the car stationary when trying to push manually, I tried putting it in gear.  It moves in both forward and reverse gears (it's automatic), and the brake holds it.  I need a lot of pressure on the brakes, but suspect that's because I haven't bled them with the engine running, so will need to remove some additional air in the slave cylinder when the servo is activated.

Due to a big drop off from the garage floor to the path outside, I didn't move the car outside of the garage, to avoid damaging the under-side (I'll get some wood to take up some of the drop), but even so I drove it forward about 6 feet, and reversed it the same distance.  Not far, I know, but after 15 months of working (intermittently) on the engine and the brakes, and understanding that the car hadn't run for 6-7 years before that, I'm ecstatic that it will actually run under its own power.

Now I just need to bleed the brakes with the engine running, then get it outside and see how it moves over distance.  WATCH THIS SPACE!!!!!!!!

Wednesday 27 April 2016

Removing the Slave Cylinder - Pt1

Having ordered the replacement brake master cylinder and slave cylinder, decided that I should get the old slave cylinder out so I would be ready to slip the new parts in as soon as they arrived.  So yesterday I went to get it done.  From what I had looked at before, I knew I wasn't going to be able to take it out without removing other assemblies.  I had already taken out the washer fluid bottle (not replaced since installing the slave cylinder reservoir) and the left side air filter housing (for accessing the Master cylinder).  This was the view I was left with:
Reservac Tank Blocking Access to Brake Servo and Slave Cylinder
The Slave Cylinder is behind and below the Reservac tank that's in the foreground, so that had to come out.  Doing so wasn't too bad - the hoses to the inlet manifold came off OK (I'd already had them off once to check the condition of the Check Valve).  The hoses connected to it were also not too bad, although a bit of prising was needed.  Fortunately all came off in one piece.  The one connection that stumped me for a while was the connection of the tank to the car body.  The bolt through the side bracket into the car body was OK, but I thought the bottom bracket was bolted to another bracket welded onto the floor of the engine compartment.  Turns out the tank bracket was just bolted through the floor.  So took out the tank to give me, at least better visibility of the Slave Cylinder:
View of Brake Servo and Slave Cylinder
The problem now was the fresh air intake hose.  That was a struggle to get off the stub out of the body, but came eventually, again, without damage.  However, when I followed the hose back to the intake itself, I found the hose split in two and kept together with a make-shift bandage - it will need replacing.
While I was getting the air hose off, I had left the Reservac tank to one side.  I had expected to see brake fluid come out of at least one of the hoses when I disconnected it, but nothing came out.  Now, when I went back to it, after leaving it lying on its side which allowed the liquid to accumulate near one of the outlets, about 3/4 of a brake fluid reservoir volume of brake fluid drained out.  I must admit, I was a little surprised at how much came out, but I shouldn't have been really, after the amount of pumping of the brakes I had done to try to get rid of all the air.

Now with pretty much everything out of the way, I could get at the connections to the front and rear brakes (via the PDWA switch) disconnected from the top of the Slave cylinder.

Now all that was left was to disconnect the cylinder from the mounting bracket at the front end, and the Servo from the car body.  Undoing the bolt from the front end wasn't too difficult, although it was awkward getting spanners onto both the bolt and the nut holding the bracket to the floor of the car.  Eventually got it, but with limited swing on the spanners, it took a while to get it loose enough to move.  The three nuts holding the studs on the servo were easier to get at than I'd expected - just involved lifting the carpet and insulation from under the pedals in front of the drivers seat and undoing them.  Once they were off, there was nothing else holding the Servo and Slave Cylinder onto the car:
Servo released from the bulkhead.
Now it was time to remove the Servo/Slave Cylinder assembly.  That's where I stopped for the day.  I had one try, and realised it was going to take quite a bit of manipulation to get the Servo, in particular, out between the frame.  It had taken me about 4 hours to get to this point, so I decided manipulation (and persuasion?) could wait for another day.  The only other thing I did was disconnect the fuel return pipe, because it lies right across the access between two of the bars of the frame, in the way of the route for the Servo/Slave to come out.

Tuesday 19 April 2016

To try to fix the problem of burning brake fluid in the engine, I've started overhauling the brake system components.  As it's the easiest to get at, I've started with the master cylinder.  Following the instructions in the manual (and the paper that came with the overhaul kit), I've got as far as pulling the piston out of the body of the cylinder.  The instructions say it should just pull out, although to be aware that the o-ring could slip into the circlip ring and make it tight.  However, I can't budge whatever it is that's stopping the piston from coming out.
The bearing that guides the piston, jammed in the bore of the cylinder.
It appears to be the bearing that guides the piston that's basically jammed in the bore of the cylinder. It's designed as an interference fit, apparently with an o-ring part-way along it, so if there's any sort of contamination got into the cylinder (after 40+ years of use), that could cause it.  The piston itself moves freely within the bearing, but once it comes up against the "stop" at the open end, that's it - not even a little movement to suggest that it will come out.  I've tried pulling with padded (so as not to damage the surface of the piston) pliers, but still can't get anything.  I've also tried to lubricate the bearing with brake fluid, brake cleaner, and penetrating oil, but to no effect.

I've been told that the bearing often breaks eventually when trying to remove them from the brake cylinder, and that they're no longer available (it wasn't part of the repair kit that I had ordered).  So, even though I'd still like to know what the condition of the inside of the Master Cylinder is like, I've decided to buy a complete (Lockheed) master cylinder, as well as a complete servo assembly in the interests of time (and my sanity).  So all the parts have been left to one side and I'm currently waiting for the new components to arrive. (The delivery van actually called yesterday to drop them off, but it was during the only 15 minute period that I wasn't around to open the door, so now I'm waiting as long as I can before moving away from the front door, on the assumption that they'll re-try to deliver mid-afternoon today.  It's like being a kid again and waiting for the time to open birthday or Christmas presents).

Tuesday 12 April 2016

The Brake Repair Kits Arrived

The repair kits arrived, so I set to and tackled the apparent challenge of removing the Master Cylinder.  It actually only took me a couple of hours to extract it from the engine.  It came out a lot easier than I expected.  The only problem I had was with one of the Nyloc nuts that holds the body of the cylinder on the pedal box studs - there wasn't enough clearance between the nut and the body to get the jaws of a spanner onto the flats of the nut in the only position I could get a spanner anywhere near the nut.  In the end I had to position the spanner in line with the stud and use an adjustable to get enough torque on it to remove the nut - fortunately the nut hadn't been over-tightened!

Master Cylinder with Parts waiting to be Fitted.
So now I have the Cylinder in the basement, with my new parts kit, all waiting for me to start the work.

Friday 1 April 2016

Brief Update - lack of Activity

Haven't written anything for a while.  Basically I haven't done much on the car in the last couple of weeks.  I've been trying to make sure I understand the braking system, and to work out where the leak could be, causing the brake fluid to get into the engine.  Basically both the Master cylinder and the Slave cylinder are indirectly connected to the air/vacuum circuit through the Reservac tank, which itself is connected via a check valve to one of the inlet manifolds.  The Master cylinder is attached to the Reaction valve of the air/vac circuit, and the Slave cylinder is attached to the servo diaphragm. To verify this, and get some suggestions on what the cause could be, I submitted a post to the "Jaguar Forums".  I was grateful for the couple of responses that came back verifying my thoughts, and suggesting that the cause could be the diaphragm in the servo.

So I've gone ahead and ordered repair kits for the Master Cylinder, the Servo cylinder, the reaction valve, and a new diaphragm for the servo.  It was suggested that I may be better off just buying replacement cylinders because repairing them could be problematic, but I bought the car as a project to allow me to do a lot of the work myself, so I'm going to try the overhauls myself (as a back-up I can buy replacement cylinders, although I'm also considering cost by initially going for overhaul rather than replacement).  All the repair kits are now on order from SNG Barratt in the US - hopefully they'll be here within the next couple of days - they've already been shipped.

Even though the servo diaphragm has been suggested as the most probable cause, I'm going to start by overhauling the master cylinder and the reaction valve, basically because they're the easier to get access to, having taken off the air cleaner (again) - photo below.

Brake Master Cylinder and Reaction Valve
If overhaul of this system works - great - I'll be done for now.  If not, then I'll have to get into the Slave Cylinder and Servo.  These are a lot more difficult to get at, and I think I'll be looking at removal of the heater fan & motor and the Reservac tank to give me access to them.  You can just about see the servo unit in the centre of the photo below; the Slave cylinder itself is hidden by the bar; that's the Reservac tank on the right.

Brake Servo in centre of photo; Reservac tank on right and Reaction valve on the Master Cylinder at top of photo.
As soon as the parts arrive I'll get the Master Cylinder and Reaction valve off and overhaul them - hopefully in the next week or so.

Sunday 13 March 2016

More on the Brakes

Took another look at the brake system today, with Steve's help.  Having tightened up all accessible joints, we tried bleeding the front brakes again. Not surprisingly, same result as last time, ie lots of air coming out and little fluid.  Similarly, when I started the engine we got lots of smoke produced.  On closer inspection, the smoke was actually coming from the exhaust, rather than a hot surface, as I had originally assumed, and there was a pool of liquid (brake fluid) below the outlet of the left-hand exhaust pipe. (note, I don't have the rear silencer box on the car at the moment, so the exhaust pipes finish half way along the Car's length).

Not understanding how so much smoke could be generated from the exhaust when we had been working on the brakes, this time we went back to "first principles" and got the manual out.

From the schematic diagram we found that the brake system effectively consists of 3 circuits - 2 hydraulic and one pneumatic/vacuum - and that the pneumatic circuit is linked to the engine through the inlet manifold, via a non-return valve.
Check Valve between Reservac Tank and Inlet Manifold
So now I'm assuming that I have a leak from the hydraulic side to the pneumatic side in either the master cylinder or the slave cylinder, but whichever it is, I know I'm getting hydraulic fluid into the "Reservac" tank on the air/vac side.

I know the areas that I need parts for, so now off to SNG Barratt's catalogue to find how much the parts are going to cost me!  Will I be able to get overhaul parts, or will I need to replace complete assemblies?  And, do I even want to tackle the overhauls?

........watch this space.

Monday 22 February 2016

Air Filters Back On

I'd been running the engine with no air filters on, although I know there's risk with this.  Anyway, I had a little time, so I refitted them on Saturday, and was surprised how much difference it has made to the engine idling - it seems smoother now, and more responsive, even though it's still not moving the car.

LHS Air Intake & Filter Housing

RHS Air Intake & Filter Housing.
(Note all the tags, still in place to ensure everything went back in the right place after servicing the carbs).


Liz, my wife, was driving by on Saturday, so I managed to persuade her to come out to the garage, for the first time since I've had the car there, just to check it out and hear the car running.  She lasted about 2 minutes standing beside the car while it was running, before she needed to leave for the preservation of her ear drums.  I've just got used to the noise (or I'm just going deaf quicker than I thought), but the car is noisy in such a small enclosed space, with no silencers on the exhaust!!.  At least she's seen the set-up, so knows the conditions I'm working in.

I'm still not moving the car because I haven't been able to get there to find the leak in the front brakes - lack of being there is why I didn't add a post in the last couple of weeks; I did pop round there a week or so ago just to run the car, and found the brake reservoir completely empty.  Just confirms the leak, but the fact that it's draining without any system pressure suggests that it should be easy enough to see once I can get the car up so I can get underneath it to watch for the leak.

The reason for me not getting out to work on the car has been the temperature.  The garage where I have the car is not heated, and the temperature last weekend in the Toronto area had dropped as low as -25C at times, which wasn't at all conducive to working on a car!  On Friday, it was up to +15C, so I was quite happy taking my time to refit the air filters - I could still feel my fingers when I finished (unlike the last time I ran the car - the heat from the car heater on my way back home made my fingers feel really painful as they had got so cold when I was in the garage).  The swings in temperature that we're experiencing here this year are crazy.  Hopefully this warming is a sign that spring is on the way, albeit a bit early, and we won't see much more snow.  (The snow that fell last week has just about taken a day to disappear with today's warm temperature).  (Woops, spoke to soon about no more snow - the forecast is for snow this coming Wednesday, Thursday, Friday & Saturday, at least - oh, well!!).

Wednesday 3 February 2016

Today on the Brakes

I knew the brakes weren't working when I bought the car; I mentioned previously that the level sensors in the reservoirs were shot.  So today, I installed the two new reservoirs with sensors.  I had also cleaned, rust-treated and painted the bracket that holds the bottom reservoir, because it was badly corroded whenI removed it to get the old reservoir out.
Top Brake Reservoir (Front Brakes)
Bottom Brake Reservoir (Back Brakes)
Having refitted the reservoirs, I proceeded to bleed the brakes.  I used a low-cost kit that I had bought from Canadian Tire to allow me to bleed the brakes on my own.  It basically consists of a fitting for the bleed screw, a bottle and a length of plastic hose.  On top of the bottle is a fitting with a non-return valve.  The bottle also has a magnet fitting to allow me to mount the bottle where I could see it.  It worked well, as I was able to monitor the fluid going into the bottle from the drivers seat, while I was depressing the brake pedal.

Before starting, I removed each of the bleed screws to make sure they were clean and clear; all were OK.

I started with the two inboard back brakes.  Easy to get at, once the back seat was removed, both sides bled fine, with virtually no air coming out of either side.  The front brakes were a different matter altogether.  The left side I pumped for about 5 minutes (probably way too long when I think about it), but couldn't get rid of air through the plastic hose.  Same problem on the right side.

By the time I had finished trying to bleed the front brakes, I was out of time for the day, so I cleaned up, then decided to run the car for a short time before I left.  The car started fine, but it wasn't long before the garage was full of fumes - guess that was just confirmation that there's a leak from somewhere in the brake hydraulic circuit, and the leak is near a surface that gets hot when the engine is running.
Some of the smoke from the leaking brake fluid - this was after 2 days.
Same day was much worse.

Don't know how long (or how much smoke) it will take to burn off all the brake fluid, but I'll try to find the leak before running the car again.  Probably going to need a bit of help with this one!!

Sunday 31 January 2016

Initial Checks Before Buying

To get back to the E-Type, after I had seen the ad in Auto Trader, I made several visits to view and check the car before finally deciding to buy.

I had been told right from the start that the car had not run for at least 7 years, had been rear-ended and had some repair work and a respray done following the accident.

The rear-end collision was proven by the damage to the petrol tank - it had a bulge in the middle, and didn't locate with the mounting points.

Bulge in the middle of the petrol tank
However, the back of the car looks fine - although it wasn't confirmed, I have to assume at least the back number plate panel must have been replaced.  Although I would have expected the lower boot panel assembly to have also been replaced, it looks original, because there is rust on it, making a small hole in the bottom of the spare wheel well.  The back bumpers are distorted and the rear light assemblies were smashed.

The original fuel pump was no longer working and had been replaced by a newer version which you can see in the photo above.  I was also shown a retrofit wire to the cooling fan, because the previous owner said that the car had been prone to over-heating.

Knowing these things, I still wanted to know that the engine had not seized.  We were able to move the car, and verify that the crank shaft was turning, although, at the time, we didn't verify movement and stroke of the pistons.

As far as the bodywork was concerned, I checked as much as I could - I checked visually and with a magnet to verify that there were no major areas rebuilt with filler, and I probed underneath, particularly the sills to make sure my probe didn't go through underseal into nothing.  All checked out OK as far as I went, but I'm still under no apprehension that, with the respray and the underseal, I may still come across area of corrosion that will either need repairs or even new body panels.  All will be revealed (or not!) as I progress.

Having as much due diligence as I felt comfortable with and feeling reasonably comfortable that I could tackle a lot of the things that would need doing, I made the decision to buy the car, as a project that could keep me going for some time.

Saturday 30 January 2016

The Path to 3 Jaguars

As an afterthought, I decided I'd write a bit about what got me to the situation of having 3 Jaguars, and doing work on the E-Type before I got too far into the process, so........... I'm Stuart Walker. I'm married to a beautiful and understanding (has to be with me!!) wife.  We have 3 young children and I have 3 old cars - all Jaguars. (My wife also has a new Toyota Sienna, so at least we have one car that doesn't need "more than average" maintenance).

When I was a kid I was really into cars. I had, what seemed at the time (especially to my Mum who had to tidy them up after I'd been playing with them) like hundreds of toy cars.  My favourites were a crimson E-Type Jag and both the silver and gold versions of the James Bond Aston Martin DB5 (good taste from an early age!). I could also name pretty much any car that we passed on the road.

My interest waned over the years, though, and, although I still kept abreast of current models, I didn't do much with them after I helped my Dad to lap the valves and replace the cylinder head gasket on my first car - an orange 1976 Mini 1000.

My cars since then have been a Mini 1275, 3 Vauxhall Astras - the last being a 16v GTE, which was really nice - and a Ford Mondeo, in England. My interest in the Vauxhalls came from the 3 models of Vauxhall Victor my Dad had during the 1970's and '80's, after he sold the Morris Oxford, which is the first family car I remember, although I think there was a yellow "something" before that.

I remember the registration of the first Vauxhall Victor we had - it was MHF 687.  I'd be interested to know if this number plate still exists, and if it's still on that same car.  (The last Victor we had was XKC 262 J. Again, I'd be interested to know if that's still around).

While still in England, I also had a Honda CBR600 motorbike, which was great fun, for a few years before I emigrated to Canada (to get married, of all things!). (Oh, and I also drove a Daewoo for 3 years in Nigeria).

Since being in Canada I've had a Pontiac Grand Am, a Toyota Celica, a 2004 Chevrolet Monte Carlo SS (a wonderful bright yellow vehicle), a 2008 Cadillac CTS, and now my daily driver is my 2001 Jaguar XJR.

My Monte Carlo - a wonderful (and bright!) car.

My first foray into Classic Cars was in the late 90's in England when I bought a 1976 MGB GT V8.  Unfortunately I didn't get the chance to enjoy this fully as I was out of the country for part of the time I owned it, and it was in the shop for repairs a lot of the rest of the time.  I had to let it go when I moved to Canada, although under different circumstances, I would have loved to have taken it with me.  I'd be interested to know if anyone knows if that car still exists - it's UK registration was ORF 976 P.

My time with Jags started in 2007, when I bought the XJR.  It was on a bit of a whim; the Monte Carlo was my daily driver, and Liz, I think, had the Buick Rendezvous at the time, so we didn't really need another car.  But, I felt I had too much money in the bank and needed to get rid of some (yeah, really - nothing to do with the fact I'd just made an emotional connection with an inanimate object), so we gained a third family car. (Apparently my Dad said to Liz that he couldn't believe I wanted to buy a Jag, when I took him with me to pick it up).  So the XJR became my summer Sunday car, resting in the garage during the winter.

In 2011 I had to change the Monte Carlo, which was experiencing paint detachment problems that I  didn't want to deal with, so I got the Cadillac CTS (with a manual gearbox!).

In 2012 I started looking at Jags again, this time at the XKR (I had, some might say foolishly, downloaded the "Auto Trader" app onto my phone, and kept looking, out of interest only, at used Jags for sale).  I saw one advertised at a local garage, so went to take a look.  It was a bit rough inside,as was the next one I saw, but at this second garage, there was a 1994 black XJS convertible.  Just visually this exceeded any thoughts I had of the XKR, so I went home, talked to Liz (actually begged, but that doesn't sound as mature!) and the following day went back to buy the car. Imagine my disappointment to find that the same morning another customer had gone to the garage to view the car, and had paid for it and driven off in it within a couple of hours.  Now, where was my Auto Trader app?

Luckily, shortly afterwards, I found an ad at another local garage for a 1994 black XJS convertable - virtually the same car.  I went to see that one, quickly verified that it was in good condition and put a deposit down.  I now owned 2 Jaguars.

My XJS - just about to be bought.

Not long after this, we decided that 5 was probably too many cars for just 2 drivers in the house (the first of the kids won't be able to drive (legally on the road) until 2020) - we also had Liz's Mum's Buick Enclave on the drive so we sold the Enclave and I decided to let one of mine go; so which one to sell? I have to admit, I'd been disappointed with the CTS - maybe because it was the manual rather than an automatic - and I had nothing like the emotional connection with it that I had (and still have - be warned!) with the Jags. So the CTS was sold and the XJR has been my daily driver since (yes, during the winter as well - it's fun in a supercharged, rear-wheel drive car in the snow!).

Then .......... Steve and I took all our kids - 5 of them between us - to a car auction in Toronto ( not really the best place to take 5 kids between the ages of 5 and 9).  While there I saw an XKR (not again, I hear you say!) in blue with matching blue interior.  The auction not being the place for me to buy, I went back to that Auto Trader app - yes it was still on my phone - and found a blue one for sale in Toronto. When I went to see it, turned out to be the same one that was at the auction but hadn't sold (should have told me something!), so I went to take a look.  I almost bought that one, but had got so carried away with it, that I realized that I hadn't discussed it with Liz, and we also had other financial commitments to cover at the time.

Anyway, some time later, I was browsing through the Auto Trader app again (I really should get rid of it before I get into serious trouble) and came across an E-Type for sale in Toronto. A bit unusual for this to be in the regular Auto Trader, rather than in the Classics, but I went to see it anyway ....... And that's how I ended up owning an E-Type to complete my set of 3.  Maybe that's the end of my Jaguar acquisitions, but after I've got the E-Type to where I want it, I may start looking again........that app is still there!


There's more about how I acquired the E-Type to follow, as well as the story of how I'm "resuscitating" it. Hope you enjoy the reading.

Friday 29 January 2016

Today's Activity

Went over to the car today to work on the brake reservoirs, but every time I go at the moment, I run the car, just to keep the engine turning over and the oil circulating. (The brakes don't work at the moment, so I can only idle the car.  I'll get back to the brakes later.

The last couple of weeks, since I first got the engine running, the engine has fired after a few turns, but today it took a while longer than usual.  It was turning but not firing, and I was starting to think I would need to use some quick start again.  However, finally it started firing on individual cylinders, and eventually ran fully.  As usual, I kept the choke out until the temperature was up to "normal", then when I pushed the choke fully in, it settled down to idle at about 1500rpm.

Around running the engine, I was getting off the bottom brake reservoir.  This one has been more difficult to remove than the top one, because it's in a more restricted location - you can get a bit of an idea from the photo.


(You can also see how bad the level sensor in this reservoir was from the next photo - the float (cork-like thing) on the end of the thin rod is supposed to be enclosed inside a metal tube - the top of the tube had completely corroded away so the bottom part had fallen off into the reservoir).


The other problem I had with this reservoir was that the hose clamp on the outlet from the reservoir was completely corroded so I couldn't turn the screw to release the clamp to remove the hose from the reservoir.  In the end I hacksawed the head off the clamp screw and removed it that way.  Because of the restricted space, I couldn't get a full stroke of the hacksaw, so it took longer than I expected to saw the head off, but once I'd done it, the hose pulled off the nipple easily.

I also removed one of the cover plates under the back seat to check the access to the back brakes (located inboard on the e-Type).  I had to remove the back seat belts in order to get a cover off the transmission tunnel so that I could get at the last of the 8 screws holding the brake cover plate on (some things are not straight forward on this car!!).  Once the plate was off, I found that I can easily get at the brake bleed nipple, and it has free rotation, so, it will hopefully be easy to bleed the back brakes.

So, on my next visit to the car next week, I'll aim to fit the new bottom brake reservoir, then start on the process of bleeding and setting them up.

Monday 25 January 2016

Introduction

I bought my 1973 E-Type Jaguar in August 2014.  I was under no illusion that this was going to be a project car; it had not run for 7 years, it had been rear-ended, which caused it to be taken off the road, and had been recovered from a repair shop, part-completed, just before the shop went out of business.  So I bought a partially completed car, with lots of bits!!  But, I got it for a reasonable price ........ and I now actually owned an E-Type Jag!!!!!!!

Since buying the car and getting it to somewhere that I could store and work on it, I've been documenting my progress, mostly in texts to a friend, Steve, who has also been helping and advising me (I'm very much a novice at this) on some of the work I've been doing.  So I thought, as I'm documenting my progress anyway, why not publish it on a blog.  Some people may find it interesting, and others may find it useful to read about the work I'm doing, and especially the mistakes I'm making, that may help them in doing similar projects themselves.

My progress is fairly slow - I manage to spend a few hours each week working on the car, but I usually manage to get at least one thing done each time I'm there, so hopefully there will be enough progress to keep peoples' interest.

The work I've done so far I'll cover as we go, while trying to give updates as they happen.

So watch this space to see if I can first get the car road-worthy and then how much I can improve its condition.